Easy Charts About the Importances of a Trail
Learning Objectives
After completing this unit, you'll be able to:
- Use the drag-and-drop dashboard builder.
- Explain the difference between report charts and dashboards.
- Set up a dynamic dashboard.
- Add a report chart to a report.
- Add an embedded chart to a record page layout.
- Create a dashboard and underlying report.
Create Dashboards
Great reports help you make decisions and take action. But sometimes you need to get your insights at-a-glance, especially depending on your audience and the device being used. Enter the dashboard, your utility for summarizing and displaying your Salesforce data in a graphical layout.
Salesforce dashboards allow you to present multiple reports side-by-side using dashboard components on a single dashboard page layout. Dashboard components come in a variety of chart types, and you can customize how data is grouped, summarized, and displayed for each component. The drag-and-drop dashboard builder is an intuitive interface for building dashboards from source reports or Visualforce pages you've created in Salesforce.
In addition to dashboards, you also have options to add charts to reports and record page layouts. Read on to learn about your options for visualizing your data with report charts and dashboard components.
Drag-and-Drop Dashboard Builder
Meet the drag-and-drop dashboard builder, your way to visualize your data for easy consumption at-a-glance. To access the dashboard builder, click on the Reports tab and click New Dashboard.
Check out this short video introducing you to the drag-and-drop dashboard builder.
Don't like videos? Check out this short overview instead:
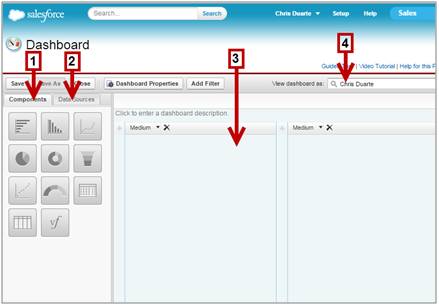
Get started with building a dashboard by dragging a component [1] into the preview pane [3]. Each component will show your report data in a different visual chart display. Once you've dragged in a component, click on the Data Sources tab [2] and select your report. Drag that report onto the component in the preview pane. It will take a moment for the dashboard component to generate the chart. Then voila! Your dashboard component will show your data. The data that is displayed varies based on the running user [4] . The user's name entered here will determine what data you see on the overall dashboard.
When selecting the component type, consider the following:
| Component Type | When to use it |
|---|---|
| | Use a chart when you want to show data graphically. You can choose from a variety of chart types. |
| | Use a gauge when you have a single value that you want to show within a range of custom values |
| | Use a metric when you have one key value to display.
|
| | Use a table to show a set of report data in column form. |
| Visualforce Page | Use a Visualforce page when you want to create a custom component or show information not available in another component type. |
Finally, when selecting a report for use in a dashboard component, all report formats may be used, however, Tabular reports must be limited by row to be used in a dashboard.
Create a Dashboard
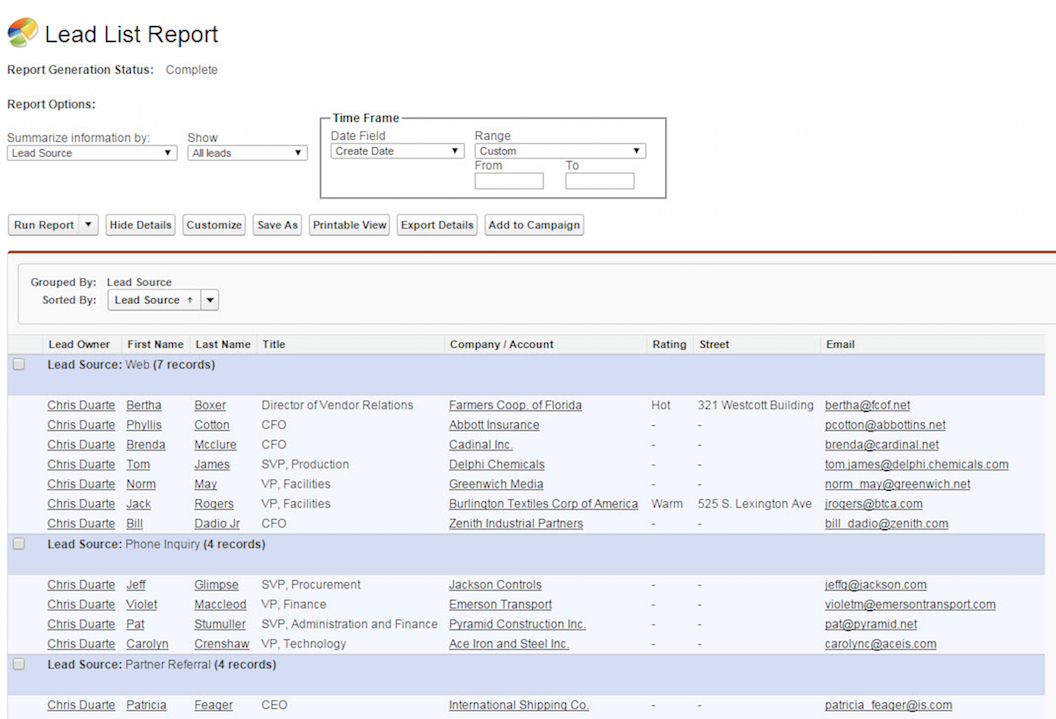
Let's walk through creating a dashboard. First, you'll need to create the source report we'll use in the dashboard. In this example, we'll make a simple Leads report.
- Click on the Reports tab.
- Click New Report and select Leads as the report type.
- Add the following filters:
- Select All Leads for Show.
- Select Create Date for Date Field.
- Select All Time for Range.
- Click Tabular Format and select Summary.
- Drag Lead Source from the Fields pane to the Preview pane into the Drop a field here to create a grouping section.
- The following columns should already be included in your report: Lead Owner, First Name, Last Name, Title, Company/Account, Rating, Street, Email.
- Click Run Report. The report should look something like this:
 Depending on which org you're using to run through this tutorial, you may or may not see data in your report at runtime.
 - Click Save As and name your report Leads by Lead Source and accept the auto-generated unique name.
- Choose the My Personal Reports folder.
- Click Save & Return to Report.
Now that your report is created, let's visualize it using a dashboard component.
- Click the Reports tab.
- Click New Dashboard.
- From the Components tab, drag and drop the pie chart component onto the preview pane.
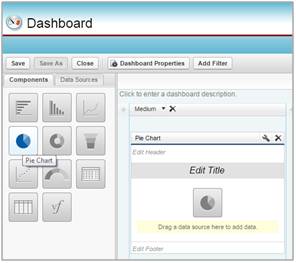
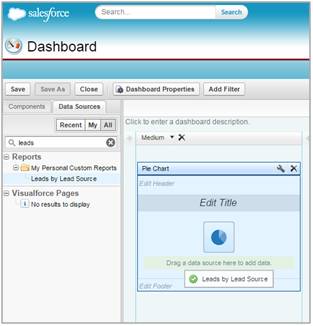
- Click the Data Sources tab.
- Search for your leads by Lead Source report and drag and drop it onto the pie chart component.
- Give the chart a moment to generate. Once it generates, click in the Edit Header section and type in Leads by Lead Source.
- Optionally enter a title and footer.
- Click on the wrench icon in the upper right corner of the dashboard component.
- On the Formatting tab:
- Select Sort Rows By and choose Label Descending. This will place the values on the component in alphabetical order.
- Select Legend Position and choose On Chart.
- Click OK.
- Click Save and name the dashboard Leads Dashboard and accept the auto-generated unique name.
- Enter a description and choose the My Personal Custom Dashboards folder.
- Click Save & Run Dashboard. You should see something that looks like this:
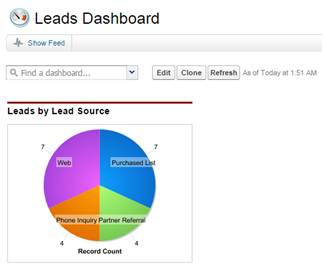
Great job! You just built a simple report and dashboard for visualizing leads by source.
When you're just getting started with building dashboards, consider downloading one of the sample CRM dashboards from the AppExchange to use as a sample. Visit this help topic for more details.
Dashboard Filters
Dashboard filters make it easy to provide different combinations of data from a single dashboard. You don't need separate dashboards for different sets of users — just give each group a filter that makes sense for them.
For example, on a sales dashboard, you might gather several stages of Opportunities into a group called "Early." This lets users quickly filter the dashboard to show only data relevant to deals that are in the early stages of development.
Let's walk through creating a dashboard filter, using our Leads Dashboard we just created. Now let's create a filter where we bucket together values from the Status field.
- Click Edit on your Leads Dashboard, then click Add Filter.
- Select the Lead Status field to filter on from the Field drop-down. If you have more than one component on the dashboard, the drop-down will show fields that can be used to filter all components. For our example, we only have one component on the dashboard.
- Give your filter a display label to identify it. If your filter has many equivalent fields, we recommend using a label that works for all components. In this example, we're using the name Lead Status.
- Under Filter Options, select an operator and provide one or more values to filter by.
- Use the Group Name field to give your filter a name. For our example, we're creating two groups: Open and Closed.
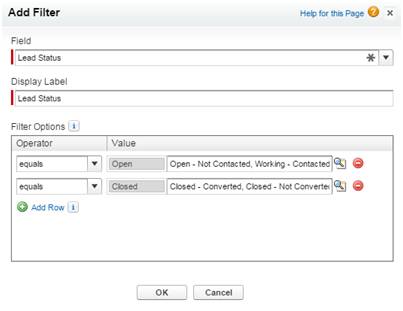
- Click OK, then Close and Save and Close to return to your dashboard. Now you can filter your components on Lead Status.
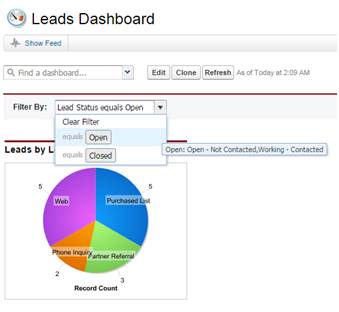
Nice one! Now you've got a filter on your Leads Dashboard for Lead Status. If you ever want to modify or delete an existing filter, from the filter drop-down, just select Edit Filter or Remove Filter.
Dashboard filter gotchas:
- Filters can't be added to dashboards that contain Visualforce components.
- It's not possible to filter on bucket fields. However, it is possible to use a report filtered on a bucket field on the dashboard page.
- Filters aren't applied when you schedule or email a dashboard.
- You can't filter data on a joined report in dashboard view or add a filter to a dashboard that only has joined reports.
Dynamic Dashboards
With dynamic dashboards, each user sees the data they have access to without needing to create separate dashboards for each user.
This means a single powerful dashboard can be used for multiple users in your company, because the logged-in user viewing the dashboard sees the data they should see, based on their security and sharing settings.
Let's look at a real-world example. Say that your opportunity team consists of one vice president, four sales managers, and 40 sales reps—ten reps per manager. You've been asked to create dashboards that display the following metrics, restricted by role and hierarchy:
Sales reps should only see their own data; managers should only see data for the reps they manage; and the VP should see data across the entire team. In this scenario, you'd typically have to create 45 different dashboards—one for every single person. You'd also have to create multiple folders to manage access rights.
With dynamic dashboards, you can create just two dashboards and store them in a single folder.
- Create a dynamic dashboard for sales reps with the following components:
- A gauge of total bookings
- A table of activities by meeting type
- Create a dynamic dashboard for managers and the VP with the following components:
- A gauge of total bookings
- A column chart of close rates by competitor
- Optionally, create filters that let viewers further refine their dashboard views. For example, create a filter on key accounts to let viewers focus on bookings, activities, and competitive threats for each account.
All users only see data that they can access. Sales reps see their own bookings and activities. Managers see bookings and close rates for the reps they manage. The VP sees bookings and close rates for the whole team. Because the metrics are the same for managers and the VP, you can use the same dynamic dashboard for both roles. The dynamic dashboards feature reduces the number of required dashboards from 45 to two!
You can create up to three filters for each dynamic dashboard. Filtering dynamic dashboards gives administrators additional flexibility in creating dashboards. For example, you can create an organization-wide sales scorecard that contains sales rep and product filters. This allows individual sales managers to view their reps' performance collectively as well as individually. It also lets them view sales by product to understand which products specific reps are or aren't selling.
And as mentioned in our real-world example, managers with the "View My Team's Dashboards" or "View All Data" permission can set an option to preview the dashboard from the point of view of users under them in the role hierarchy.
Set up a Dynamic Dashboard
- From the Dashboards tab, create a new dashboard or edit an existing one.
- Click View dashboard as drop-down button next to the View dashboard as field.
- Select Run as logged-in user.
- Optionally, select Let authorized users change running user to enable those with permission to change the running user on the dashboard view page.
- Users with "View My Team's Dashboards" can view the dashboard as any user below them in the role hierarchy.
- Users with "View All Data" can edit the dashboard and view it as any user in their organization.
- Users with "Enable Other User's Dashboard" can edit the dashboard if they have access to it, even if they aren't the running user and don't have "View All Data."
- Click OK.
- In the View dashboard as field, enter a running user.
- Save your dashboard.
- Set the appropriate Show option on the report run page.
- For example, if you choose "My Team's Opportunities," each dynamic dashboard viewer can see all opportunities for the team.
Create Charts
Report Charts
If you don't want to create a dashboard, but just want to add a chart to your report, then report charts may be right for you. Report charts allow you to place a single chart right at the top of your report, so that when you view the report, you can see the chart and the report results in one view.
Here's how you add a report chart:
- Open a report in report builder.
- Click Add Chart in report builder. For existing charts, click Edit Chart.
- Select a chart type.
- Enter the appropriate settings on the Chart Data tab for the chart type you selected.
- Enter the appropriate settings on the Formatting tab.
- Click OK.
Presto! You've just added a report chart to your report.
Embedded Charts
Since we're putting some charts in Salesforce, why not embed them in your object records? Embedded charts allow you to add up to 2 charts on a single page layout. Here's an example. Additional limits apply, see this help topic for more details.
Before you add a chart, check that:
- Its source report is in a folder that's shared with users who need access. Reports in personal report folders are unavailable to add to a page.
- The source report format is summary or matrix.
- The source report has a chart.
All set? Let's go!
- Go to the page layout editor for the object you're adding a chart to. In this example, I'm using Cases. In general, choose the object you're working with.
- For a standard object, from Setup, click Customize | Cases | Page Layouts.
- For a custom object, from Setup, enter Objects in the Quick Find box, then select Objects, then choose the object.
- For an external object, from Setup, enter External Objects in the Quick Find box, then select External Objects. Select an external object in the list.
- Click Edit next to the page layout.
- Click Report Charts.
- In the Quick Find box, type the name of the report and click the Quick Find icon to find and select the report chart. You can browse up to 200 recently viewed reports by chart type in the Report Charts palette.

- Drag the chart to a new or existing section of the layout.
- Click the Wrench icon on the chart to customize it.
- Click Save.
Well done! You've just added a report chart to a page layout.
fountainthessight.blogspot.com
Source: https://trailhead.salesforce.com/content/learn/modules/reports_dashboards/reports_dashboards_visualizing_data
0 Response to "Easy Charts About the Importances of a Trail"
Postar um comentário